03 March 2018

Using a {Themed} Kit...

Have you ever purchased a themed kit and felt unsure how to use it outside the intended theme?  OR... have you declined from purchasing a themed kit, for the same reason?

Being on creative teams have certainly pushed me to think outside the box when it comes to these kits and products... 

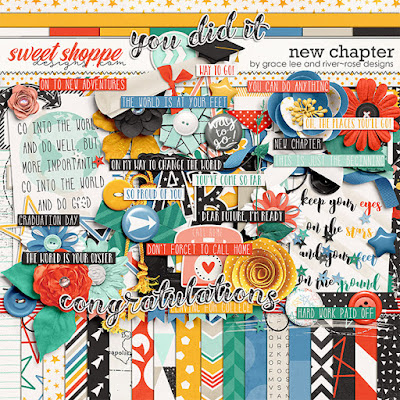
Take for example, New Chapter by Grace Lee and River-Rose Designs...
What's not to love?  It's bright, fun, and perfectly balanced... but, it's graduation themed.  My kids haven't graduated yet... my niece and nephew's graduations have already been scrapped... so, how am I supposed to use this amazing kit, and will I ever use it again?

Here's how I determine whether or not to 'go for it' with a themed kit.

First of all, I have a style of scrapping.  We all do.  I like to make my digital layouts resemble paper layouts.  I like three dimensional elements and anything I can shadow or layer.  So when I am deciding to purchase a kit, I look at exactly that.  Will it fit into my style?  Are there enough elements I can use?  Maybe you are more of a graphic style, and you love stamps and word art and all kinds of 'grunginess', you will automatically look for that in a kit... even in a themed kit... then decide if you can use it multiple times.

Second, I decide whether or not I can re-use the product.  In this case, I will re-use it when my kiddo graduates next year.  Perfect, right?  Better yet?  It's great for a BOY (and if you have boys, you know that can be quite a struggle!).

Finally, I think you just have to love it.  You have to be drawn to it.  I'm a color driven scrapbook artist, so this automatically made me swoon...  I mean, look at all those bright colors!  Look how the black and white balance the colors perfectly!  (Can you tell I love this!?)

After thinking about all those things, which I've done enough now that it's almost reflex... you go for it! (or don't, which I hope you know every single designer absolutely respects!)

Here's what I came up with using this graduation themed kit...
It has nothing to do with graduation or starting something new...  and I think I pulled it off!  What do you think?

Next time you are faced with a decision about a themed kit, I hope this helped your decision making just a little easier.  My advice?  Start thinking outside the box a bit...  your creativity will bloom more than you could ever imagine!

___________________________________________________________________________________


27 October 2017

Tutorial Tuesday | Titles Matter

Okay... okay...  it's not Tuesday... but, after a busy week, here's my tutorial that I wrote for The Digital Press Blog...  and titles DO matter.

Have you ever looked at your layout and wondered what was missing?  It could be the title...  I never thought much about how important a title could be to a layout, but it can add balance, interest, and it can even be the focal point.

If you look at my layouts, you can quickly see that I decided to make the title a central focus... but, in two very different ways.

[credits: Purfect Tales by Anita Designs and ningoesdigi - kit & cards, Alpha Stash No. 5 by Tracie Stroud]

[credits: Tender Little Moments by Dawn by Design]

No matter how you use your title, whether it's shadowed or stamped, it becomes part of your layout.  It essentially completes your layout...

Take a look at my tutorial at TDP to learn some tips about how to make that perfect title for your digital or hybrid project. 

Do you have any tips I've missed?  Comment and I'll add them!

___________________________________________________________________________________


15 September 2017

pumpkin.coffee.life.

The temps are dropping, the leaves are changing, and pumpkin spice becomes life...  Canned pumpkin starts flying off the shelves, lines are forming at Starbucks for their infamous Pumpkin Spice Lattes, and yoga pants are being donned by women everywhere.
FULL DISCLOSURE - I've never been a big fan of pumpkin, and I've never even had a PSL from Starbucks... *gasp!*  BUT, over the last several years, my love for pumpkin has grown... so you can all relax (still never had a Starbucks PSL, though).

I have a real problem spending my Smart Points on drinks, but I will definitely make exceptions...  My fave exception is a Venti Skinny Vanilla Latte made with almond milk (iced or hot depending on the weather) - it's 4 SP, people!  Totally worth it in my little world!

Ok, back to why you're here.  I have an amazing, 'pumpkin+coffee=holy crap!' recipe for you to try this fall...  and it just happens to be [wait for it] a crock pot PUMPKIN SPICE LATTE!  Totally SP friendly, so no one will be the wiser!

Crock Pot Pumpkin Spice Latte
3 C. fat free half and half
2 C. vanilla unsweetened almond milk
6 C. strongly brewed coffee
3/4 C. canned pumpkin
1/8 C. vanilla extract
1/4 C. brown sugar Splenda blend
2 tsp. ground cinnamon
1 tsp. pumpkin pie spice
2 cinnamon sticks

Directions:
Mix half and half, almond milk, and coffee in crock pot.  In a bowl, mix together pumpkin, vanilla, sugar, and ground spices.  Mix in crock pot and stir.  Add cinnamon sticks.  Cover the crock pot and cook on high for 2 hours.

I figured (using the WW app) the recipe at 3 SP for approximately one cup.  You can add some cinnamon on top or even fat free cool whip topping.  Such a wonderful fall drink... it's like a hug in a cup!  Not only that, but so easy.  Wouldn't this be perfect for Thanksgiving!?  Just throw it together and forget it while you make all the other goodies...  #holidaywinning

So, there you go.  I hope you try it, I hope you love it, and I hope you are wearing yoga pants and boots so you can get the FULL fall experience!

Happy fall, peeps... and stay tuned for more point friendly pumpkin yums.  #pumpkineverything

_________________________________________________________________________________


it's the journey... inspire.believe.create.  A blog about life, love, creativity, home, food, wine, step-parenting, weight loss, Jeeps, fitness, running, traveling, entertaining, fashion, being gluten-free, and...  cats.  Join me in embracing the chaos.


27 August 2017

Belated Tutorial {Spherize}

So here it is...  August.  I said I was going to blog more this year, and all of a sudden, the year is almost up!  How is that possible!?

I wrote a Tutorial Tuesday for The Digital Press Blog (in May...) and wanted to share it here...  and I hope you enjoy it!  

I created a layout using the Spherize Technique many years ago... and I gave it another go.  This one turned out just as fun!

http://www.thedigitalpress.co/tutorial-tuesday-the-spherize-technique/


Happy Scrappin'!

11 February 2017

My {VISION}board

Here I am, just a girl, always trying to be a better version of myself.  I started my weight loss journey last February... little did I know that I would find these amazing friends (I really can't imagine my life without them, now!), become a runner, and look forward to trying healthy new foods and activities, like rock-climbing and yoga?!  What?!

It's a process.  It doesn't happen overnight.  I'm constantly working on understanding my relationship with food, fighting wants over needs, and yes, sometimes I don't want to work out or run... gasp!  I am human.  But, as far as I can tell, my little choices every day have served me well, and I will keep at it. 

So, as a tool to help motivation and inspiration, I was challenged to create a visionboard.  Shocker, I jumped on the chance... cuz, I'm kinda creative, ya know.  Here's what I came up with and I can't wait to share with my group! 

Everything I used is from The Lilypad...

Thanks for stopping by!  Please message me if you want any more information on my success at Weight Watchers.  I believe in this program!  


06 December 2016

Christmas Planner 2016 {revamp}

Well, Christmas is here again!  My goal for 2017 is to create more tutorials, projects, and crafts that I can share on my blog for any crafty & creative peeps out there...  but, instead of waiting until January, there is no time like the present!

I'm sharing this awesome Christmas Planner again, because, well, I love to make lists, and I can make tons of lists in this bad boy.  Maybe it's too late for you to use for this Christmas, but then again, if you procrastinate like me, it'll be just in time for you to organize your thoughts, gifts, and gatherings!

I revamped the printable...  because well, it needed a font update!  If you are reading this, I'm guessing you can understand the font obsession!

I hope you enjoy and share with me if you make one!  Feel free to grab the printable if you like...  Merry Christmas!

Here’s what you’ll need:
  • composition notebook
  • 2016 Christmas Planner Printables
  • length of ribbon (about 36 inches)
  • 3 sheets of patterned paper
  • punch or circle cutter
  • adhesive (my preference is Glue Dots)
  • ink pad (optional)
  • paper cutter
  • 2 envelopes

You'll start by adhering your ribbon around the notebook...
Trace around the cover of the notebook (or measure, but beware that not all composition notebooks are the same size) on the back of printed paper and cut out using scissors or a paper cutter.  Then cut a 2 inch strip of another pattern.  If you wish, you can ink the edges of the cut out paper to give your planner a grungy look…  but that is totally optional!


You will also want to cut out a large circle of patterned paper (I used Creative Memories Circle Cutter and cut a 5 inch circle)…  along with the 2013 Christmas Planner and Christmas Tree circles on the printable sheet.  Next we get to start using those Glue Dots...
 
 Here’s where it gets fun!  The awesome thing about making something like this, is you can personalize it.  My tabs (found on the printable sheet) are going to be calendar, gifts, cards, addresses, and menu…  but, you can choose whatever you want for your tabs.  In your gifts section, you can have an envelope* for your coupons and receipts… and you can print out calendars (monthly or weekly) and paste them into your calendar tab (I used CalendarLabs).  You can choose how big each of your sections are and you can even make spots for Christmas memory photos and you have a 2016 Holiday Scrapbook!
*I just used a couple card envelopes I had laying around…  but, you could use something more sturdy like a 6″x9″ manilla envelope.
 ….and here’s my work in progress!…
 Update:  As you can see I made this original one in 2013.  I have since used it for each year, and it's been a life saver.  Especially knowing who I send Christmas cards to, my favorite recipes, and even what we got the kids each year.  I hope you enjoy this as much as I have!

There are tons of Christmas kits out there that you can use for your patterned paper and even elements, journal cards, stamps, etc...  My favorite stores are The Digichick and The Digital Press.  They have WONDERFUL Christmas sections, so go check it out!  

The Digital Press is also running a fun blog series for the holidays.  If you are creative & crafty, it is not to be missed!

From me to you, I hope you all have a wonderful Christmas holiday! 

Many blessings,

09 January 2016

Let's Get Sketchy {Challenge}

I thought I'd participate in a fun sketch challenge over at Let's Get Sketchy!  It's been awhile since I used a sketch... and for the life of me I don't know why!  I LOVE sketches!

Okay, okay...  I'll show you already! 

Here's the sketch...
...and here's my take...
Aren't you just in love with those amazing colors?!  I created this layout featuring my sweet little girl (not so little anymore, I guess...) with Peppy by France M. Designs, Meg Designs, and Anita Designs.  It's beautiful, fun, sassy, sweet, and totally fun!

By the by...  it's on sale right now over at The Digital Press! ;)

Thanks for stopping by and peeking at my layout!

Have a wonderful weekend!


23 August 2015

Drop Anchor {Freebie}

Hey there!  Wow, what a busy summer!  I can't believe it's almost September... the kiddos are back in school... and here I am looking forward to sweaters, hoodies, changing leaves, and boots!  

BUT, before we get too far into fall...  here's a kit perfect for your summer water adventures! 

France M. Designs is the featured designer over at MScraps!  She has created an adorable mini kit that is yours for free...  and you DO NOT want to miss it. 

Wanna see it?


...AND...  if you sign up for her newsletter, you'll get some extras to go along with this lovely mini! {solids and dots}

...AND...  if you follow her Facebook fan page, you get MORE! {glitters and vellums.- who doesn't love GLITTER?!}


Now here's what I created with this sweet thing...

 
I really love reminiscing over our trip to San Francisco last September.  It was truly my favorite trip with my love {so far}, so when I see a kit that is just perfect for these beloved pics, I'm ecstatic that I get to scrap them!  I'm sure I'm not the only scrapper who feels that way about some of their photos!

Don't forget to get over there and sign up so you can grab this mini!

Hope you all had a wonderful summer {if you are in my side of the world} and are looking forward to fall!  

Many blessings,

12 July 2015

Do you {RE-DO}?

Not that long ago, someone asked over in The Digichick Forums, do you re-do your layouts from way back when you first started?  

My immediate response?  Heck yes!

I actually have a folder on my computer full of layouts that I'm hoping to makeover.  There's a ton of reasons I want to do this... the main reason is that I've really developed my style and learned so much, I know I can do better.  It doesn't have anything to do with not liking the kit I used originally, for me, it's just because I didn't do my photo(s) justice!

The other side?  A LOT of responses were... absolutely not!  Some would never go back and makeover any of the layouts they've previously created. 

In my honest opinion... there is NOT a right answer here!  It's personal preference.

So, back to my Heck Yes response...  I chose to makeover a Disney layout I created many years ago.  Again, it's not that I don't like the kit (I mean, it's a Disney kit for Heaven's sake!), but I know I could make it cleaner and make my photos (which are by no means perfect) the star of the page!  

It was fun... and I see lots of 'RE-DO's' in my future!

Sooooo.... here's the original..... (This was before I knew the importance of credits, so I unfortunately can't tell you the designer of the kit.)
Here's my makeover... much cleaner.  I feel like the photos are the focus of the page and the elements don't distract from that.  This page is created with Project Mouse (Basics No. 2) by Sahlin Studio and Brittish Design.
I don't think there is anything wrong with going back and making over an old layout.  I had a good time doing this... and by using these pictures from our first trip to Disney, I got to reminisce over how much fun we had!  That was the best part!


Oh, and I'm currently working on making some new Journal Cards for my Weight Watchers Smash Book!  I'll post them when I get them done...  curious?

Thanks for stopping by!  


09 July 2015

So.Many.Projects. {So Little Time!}

You guys.

Yes, it's been awhile... but, I realize now that I totally underestimated the time and effort it takes to get a house in shape to put on the market!  Do you ever have so many projects going that you just can't see straight?  Yep...  that's me!  No, not only scrapping projects (which I have a ton of those started, but not finished), but PINTEREST projects have taken over my life!  Some have been successes, others pretty massive fails, and some that leave me shaking my head and saying "What the...?!?!"

Ok, anyhow...  In the midst of the madness of my life right now, I'm still scrapping!  No rhyme or reason to my scrapping, it just basically gets me through the week.  I've often thought I should create pages chronologically... or with some sort of reason, right?  BUT, as organized as I pretend to be, that just doesn't work for me.  I have a P52 going for this year, which I thought would help me stay focused, but not so much.  (I may be way behind, but I'm not giving up!)

So what about you?  Do you scrap chronologically?  by kid?  by event?  by vacation?  Do you only scrap with a certain style, like Project Life?  I don't feel the least bit guilty for having books with random times and events, or even styles!  All I know is that my family loves reminiscing over my pages, and that, my friends, is the point of doing what we do!

Enough talking, right?  Here are some layouts and the fabulous kits I used to create them!

I used Absolutely Amazing by Kimeric Kreations for this Disney 2 page layout...  


This next one is the first page of a soon to be 2 page layout featuring our daytrip to St. Louis just recently.  I used The Morning Sun Kit by JB Studio

I had so much fun with this one!  Look at Gabe!  He's getting so teenager-y...  sigh...  Created with Hipster by Meagan's Creations

...and my most recent layout...  created with The Mother Road by Meagan's Creations.

That's just a few of the many layouts lately... but just wanted to share!  Don't forget about the challenges over at The Digichick!

Many blessings, friends!

07 February 2015

Project{52} & Basic Clipping Mask Tutorial

Well, I finally started... good grief it took me forever and now I'm already behind!  Only about 5 weeks into the year... figures...

BUT...  I'm really happy with my first 2 weeks.  I get really caught up in making my layouts look perfect, but why?  I'm doing this so we can remember what we did this year.  I'm not doing this to impress everyone...  so as long as I love them, what's it matter?  Right?  Anyone else deal with this?  :)

Here's my first two weeks...  and I have to say it would have taken me WAY longer to get them done if it weren't for the Photo Focus Pockets Templates by LJS Digital Designs.  They are just awesome and there are tons to choose from.  They are easy to use and they even have the shadows done for you!

Let me show you...
http://www.thedigichick.com/shop/Photo-Focus-Pocket-Templates.html

http://www.thedigichick.com/shop/Photo-Focus-Pocket-Templates-2.html

http://www.thedigichick.com/shop/Photo-Focus-Pocket-Templates-3.html

Aren't they awesome?  So easy and tons of choices.  Can't beat it!


For those of you who are just starting out with Project Life or Photoshop in general, I want to share with you a very simple little thing that has saved me tons of time since I learned about it...  Incidentally, it took me awhile to try it...  why do we do that?  It's not complicated and seriously... it's a life saver!  

It's a little thing called CREATING A CLIPPING MASK...  Basically, it's a fancy way to say you are 'clipping' your paper to a shape or text...  The paper version example:  Say you have a chipboard heart.  You cut out a piece of patterned paper/cardstock or photo to glue onto the heart.  Easy right?  Well, the digi version is MUCH easier!  Here we go...  (my screenshots are made in Adobe Photoshop CC, but they can be adapted easily to Photoshop Elements)

Step 1:  Open a template, shape, or text.  (I've used one of the templates shown above) 
Step 2:  Drag your paper to the layer above whatever you want to 'cover'.
Step 3:  Select the paper or photo and right click.  Select Create Clipping Mask from the drop down menu. You can also hold down ALT and place your mouse arrow on the line separating your layers in your layer palette.  You will then see a little down arrow and white box, simply click your LEFT mouse and it's clipped!
This is what it will look like...  Now at this point, you can move or re-size your paper or photo to make it look exactly as you want it.
Step 4:  Click on both layers, RT click, and choose Merge Layers.  Now you can add a shadow or whatever else you want to do!
Here's a couple tips... make sure your layer that you are clipping to doesn't have a shadow on it when you clip it...  and you just have to play around with it.  It took me a little bit to get the hang of it, but I use it on almost every single thing I create now!

Please let me know if this spurs any questions...  if I don't know the answer, I certainly know some amazing Photoshop gals who can help me answer you!

Happy scrapping!